SETUP GUIDE
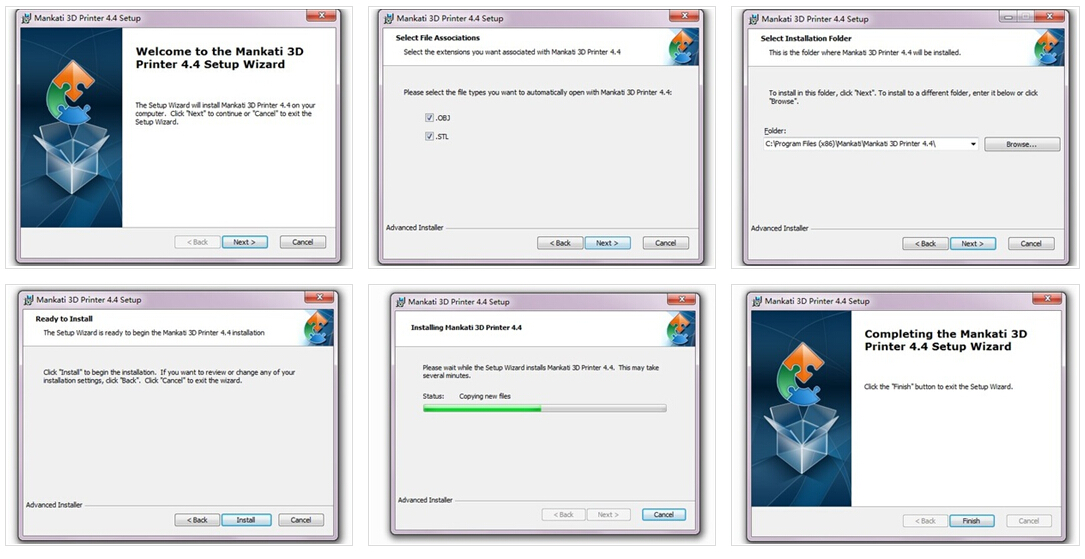
Download and Install
Enter Mankati official download website:www.mankati.com/download.html
Choose the appropriate version of Mankati UM according to your computer operation system. Our software apply to Windows, MacOS, Ubuntu operating system.Right click the software installation program, select "run as administrator" and install it following the prompts.
Right click the software installation program, select "run as administrator" and install it following the prompts.
Interface
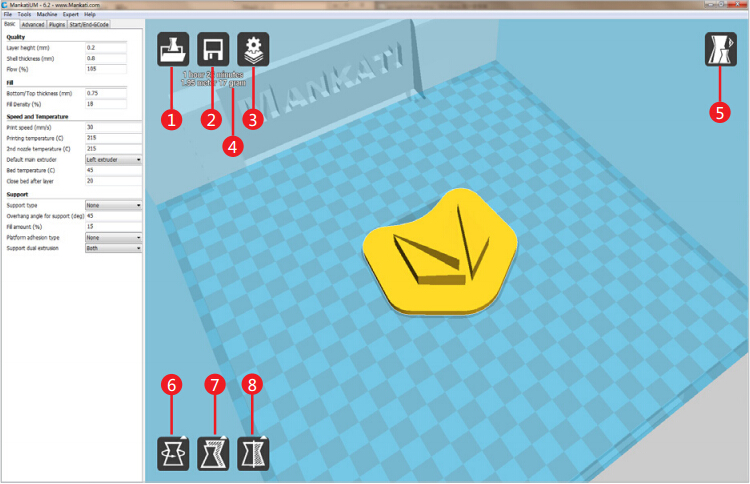
1. Load 3D model, supporting the files of STL/OBJ/DAE/AMF.
Note: MankatiUM also can recognize planar images, and transfer them to 3D model files. Supporting the files of JPG/BMP/PNG.
2. Save as Gcode file
3. If change any slicing setting, please click this "Slice" button to show the real printing time and filament requirement.
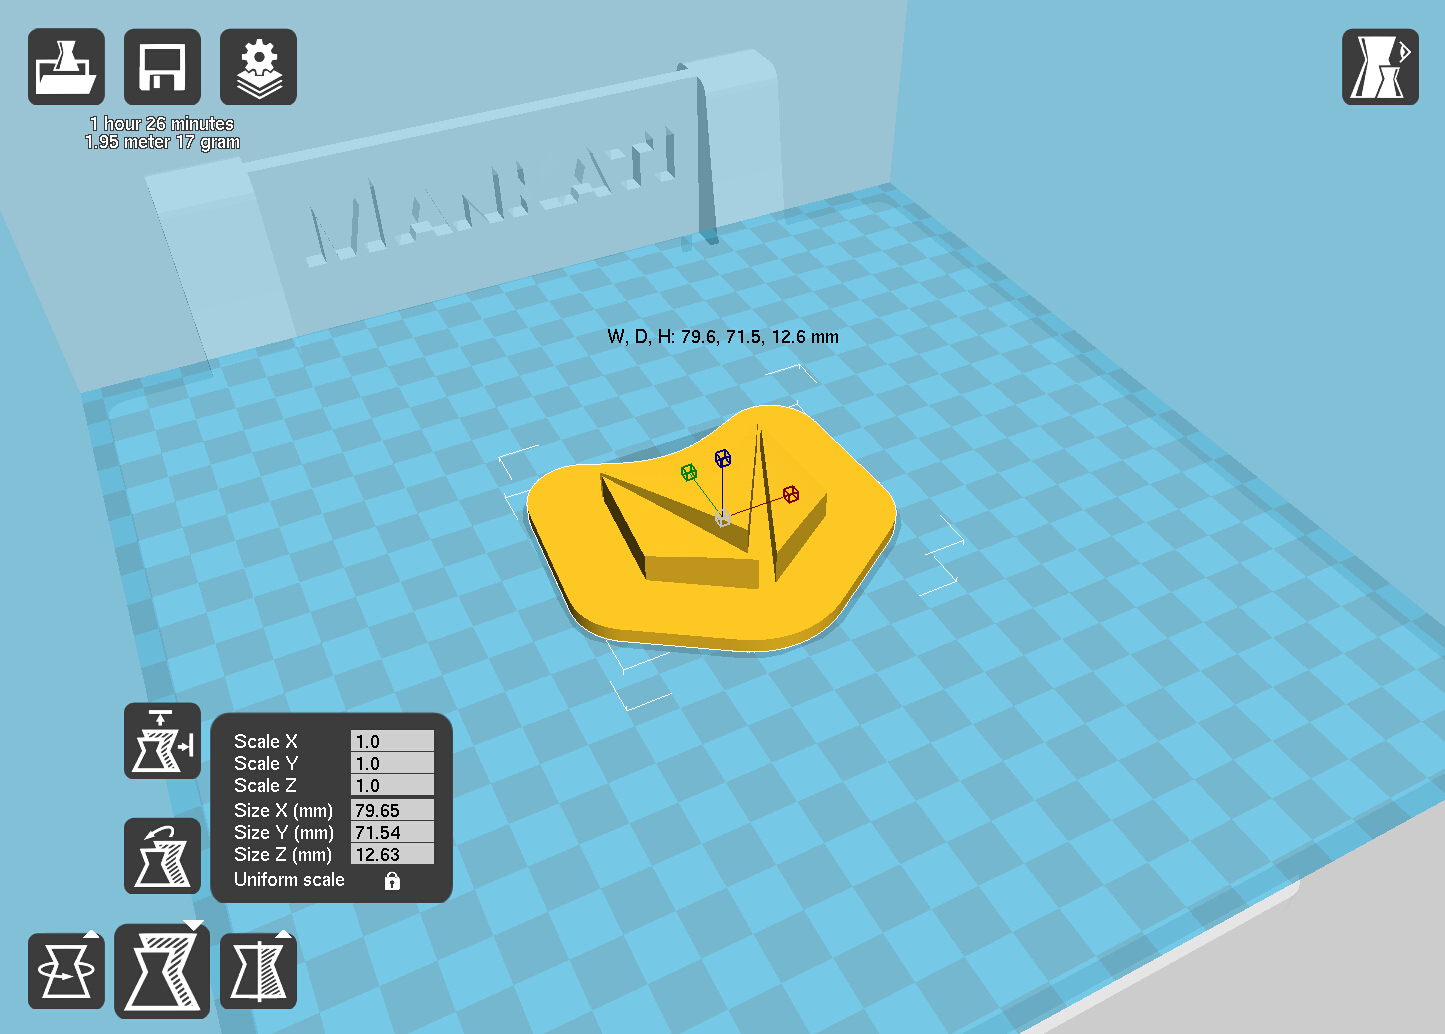
4. Printing time, the length and weight of filament consume.
5. Simulate the printing process under different modes.
5.1 Normal: Default state
5.2 Overhang: Measure the angle of overhang, and judge if it is necessary to generate the support structure
5.3 X-Ray: X-ray vision
5.4 Layers: Layer by layer to simulate the printing process
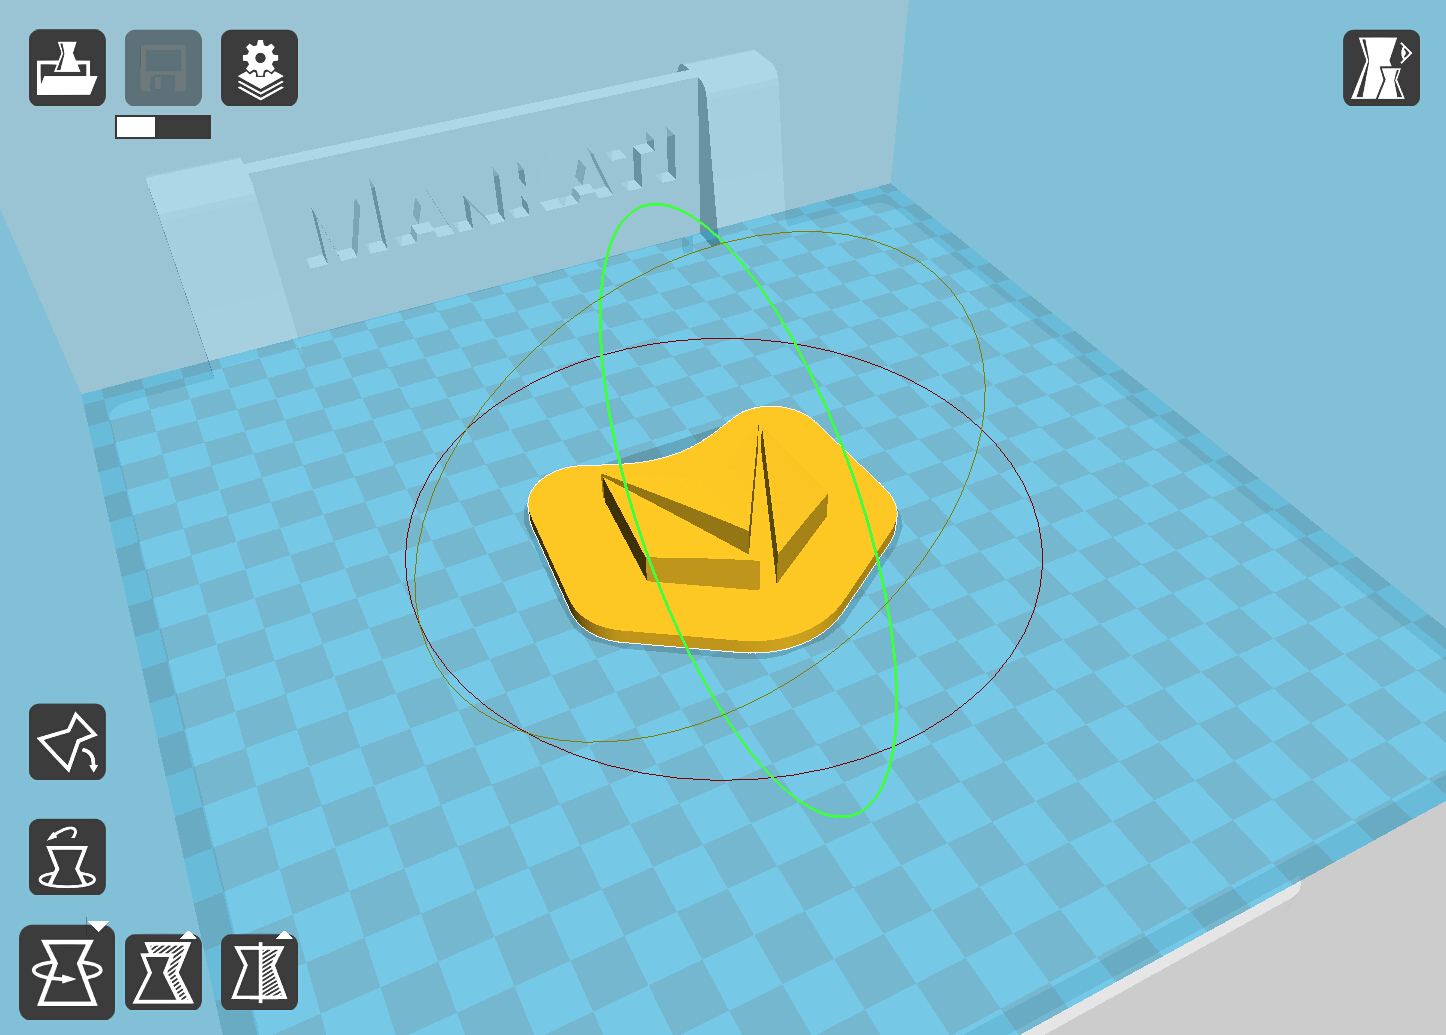
6. Rotate the model
7. Change the size of the model
8. Mirror image of the model
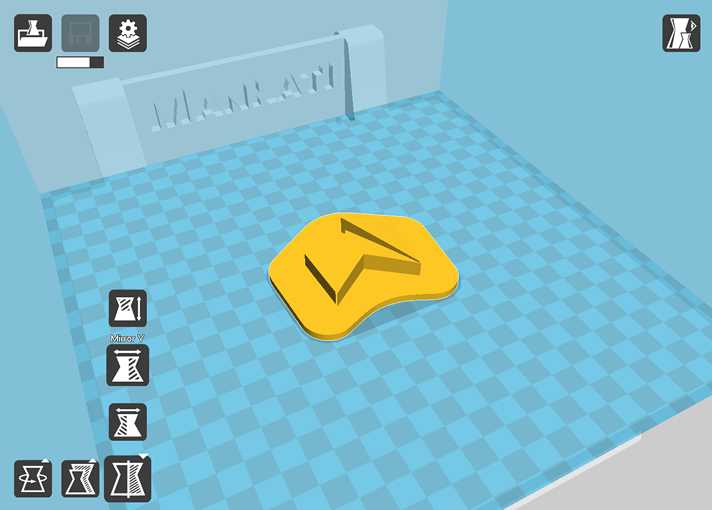
9. Other operation
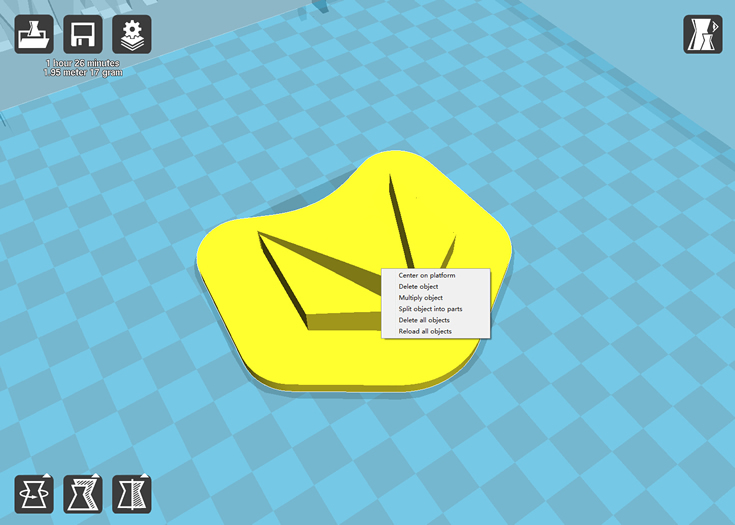
Five options for choice:
- Center on platform
- Delete object
- Multiply object
- Split object into parts (It will take too much time, so it is better to do this in modeling software)
- Delete all objects
Parameter Definition
Basic Setting
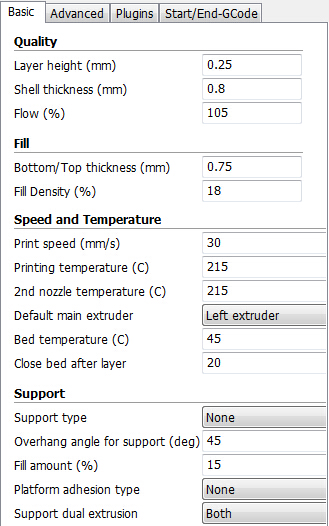
Note: Function prompt will be shown when you place the cursor on the tab.
Quality
Layer height: The lower layer height, the higher printing accuracy within certain limits
Super accuracy printing: Recommended set as 0.1mm
High accuracy printing: Recommended set as 0.2mm
Giving consideration to both printing speed and accuracy printing: recommended 0.25mm
High speed printing: Recommended 0.3mm
Higher precision printing is available as 0.04mm, but because the filament extruded at 0.04mm is too soft and thin, which cannot print complicated model. Meanwhile, the speed will get low too much.
So here we don't recommend the printing less than 0.1mm unless it is inevitable.
Shell thickness: Thickness of the outside shell in the horizontal direction. Common setting as integral multiples of nozzle diameter to represent the outer wall print laps.
Flow: Flow compensation, the amount of material extruded is multiplied by this value.
Fill
Bottom/Top thickness: Used as the model need capping. Common setting as integral multiples of layer height, keep it near your wall thickness to make an evenly strong part.
Fill Density: Means the net support structure inside the model. The higher fill percentage, the higher density of net support. 0 means non-fill, and 100% means solid fill.
Speed and Temperature
Printing Speed: Means the extruder’s moving speed. Printing speed decides the quality of printing model quality. Mankati Fullscale XT’s default speed is 30mm/s. High speed printing can be set as 50-70mm/s.
Higher speed printing needs a balance by increasing nozzle temperature, otherwise may easily cause shortage of filament’s
feeding. Printing speed also depends on the shape of model and many other factors. Recommended speed is ≤70mm/s. ≥70mm may cause the step motor losing steps, which will reduce the model printing accuracy.
Printing Temperature: Main extruder temperature(default as left extruder), setting according to the different melting temperatures of different filaments.
2nd extruder temperature: Vice extruder temperature(default as right extruder), setting according to the different melting temperatures of different filaments.
Default main extruder: Choose which one to be the main extruder. Default as left extruder. After finishing a model and you want to print another model in different filament(different colors and different materials). Changing vice extruder as main extruder can solve frequent changing filament problem. This function can come effective only when printing single color filament.
Bed temperature: Setting according to the different melting temperatures of different filaments.
Close bed after layer: Close bed temperature after certain layers. Not only energy, but also can prolong the life of the hot bed. 0 disable this feature.
Support
Support type: For the model has parts hanging in the air, support structure is a must when printing to ensure the parts hanging in the air will not collapse.
-None: No support, if you print model with parts hanging in the air but choose structure as none, the parts hanging in the air may droop.
-Touching Build Plate: Most commonly used support type, means the support will only been created when the support structure touches the build plate.
-Everywhere: Create support wherever there is part hanging in the air.
Note: Support structure may affect the smoothness of model surface and printing speed.If not essential, recommend to modify or split model to reduce the use of support.
Platform adhesion type: Different options that help in preventing corners from lifting due to warping.
- None: Default form of using outsider lining.
- Brim: Adds a single layer thick flat area around your object which is easy to cut off afterwards, and the recommended option.
- Raft: Adds a thick raster at below the object and a thin interface between this and your object.
Note: Enabling the brim or raft disables the skirt.
Support dual extrusion: Which extruder to use for support material. For easy break-away support you can use either extruder.
You can choose main extruder(left extruder) to print main structure, 2nd extruder(right extruder) to print soluble support material.
Advanced Setting
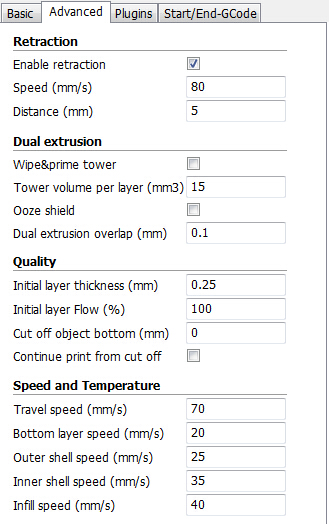
Note: Function prompt will be shown when
you place the cursor on the tab.
Retraction
Enable retraction:Enable filament retraction function
Retract the filament when the nozzle is moving over a non- printed
area to avoid dropping and brushed. Details about the retraction can
be configured in the advanced tab.
-Retraction speed: Speed at which the filament is retracted, a higher retraction speed works better. Commonly used as 80mm/s. A very high retraction speed can lead to filament grinding or breaking.
-Distance:Amount of retraction. Set at 0 for no retraction at all. A value of 5 seems to generate good result.
Dual Extrusion
Wipe &prime tower: The wipe-tower is a tower printed on every layer when switching between nozzles.
Tower volume per layer: The amount of material put in the wipe/prime tower. This is done in volume because in general you want to extruder a certain amount of volume to get the extruder going, independent on the layer height. This means that with thinner layers, your tower gets bigger.
Ooze shield: The ooze shield is a line thick shell around the object which stands a few mm from the the object and catches any oozing from the unused nozzle in dual-extrusion.
Dual extrusion overlap: Add a certain amount of overlapping extrusion on dual-extrusion prints. This makes the different colors filament jointed better. Default 0.1
Quality
Initial layer thickness: Layer thickness of the bottom layer. A thicker bottom layer makes sticking to the bed easier. Set 100 means setting the bottom thickness the same as other layers.
Initial layer flow: The extrusion capacity when printing the bottom layer.
Cut off object bottom: Sinks the object into platform, this can be used for objects that do not have a flat bottom or cutting off the already finished model height in order to stick or montage with other parts easily.
Continue print from cut off: Continue print from cut off. The print will first raise the nozzle to the height, then continue print the object left last time.
Note: when select this function, should disable brim, raft and skirt features at the same time.
Speed and Temperature
Travel Speed: Moving speed without printing.
Usually setting at 80 is the best choice, also can reach speeds of 150mm/s at most. But it may cause the motor stop missing problem.
Bottom layer speed: The bottom print speed. Recommended 20, set as 0 means the same as other layer. Reducing the bottom layer speed can help model stick more closely to platform.
Outer shell speed: Speed at which outer shell is printed. If set to 0 then the print speed is used. Printing the outer shell at a lower speed improves the final skin quality. However, having a large difference between the inner shell speed and the outer shell speed will effect quality in a negative way.
Inner shell speed: Speed at which inner shells are printed. If set to 0 then the print speed is used. Printing the inner shell faster than the outer shell will reduce printing time. It is good to set this somewhere in between the outer shell speed and the infill printing speed.
Infill speed: Speed at which infill parts are printed. If set to 0 then the print speed is used for the infill. Printing the infill faster can greatly reduce printing time, but this can negatively effect printing.
Expert Setting
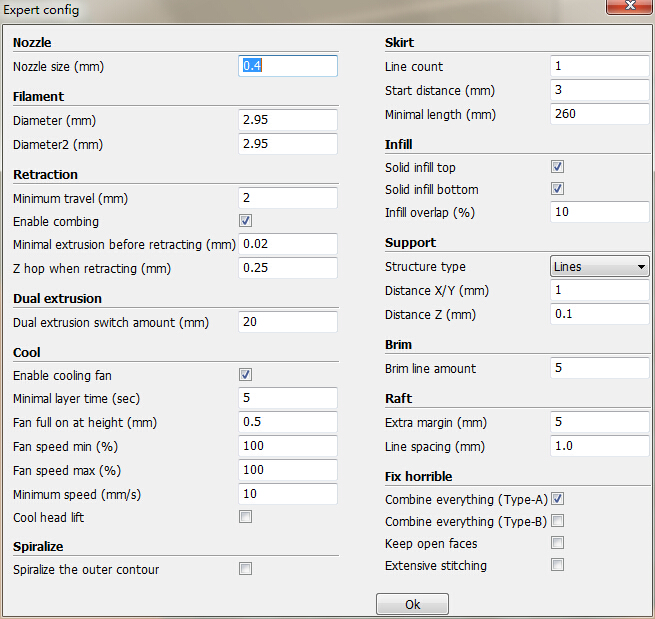
Nozzle
Nozzle size: Nozzle diameter
Mankati Fullscale XT’s default nozzle diameter is 0.4mm. So in Mankati UM the nozzle size’s default is 0.4. If you choose 0.3mm, 0.5mm or 0.8mm diameter nozzle, please fill the corresponding right feature.
Nozzle size has a little influence of accuracy on Z axis direction. But if printing fine structure model, smaller diameter can help to get better result.
The relationship of size of the nozzle and print speed are square times, so increasing the nozzle will greatly improve print speed.
Filament
Filament Diameter: Print filament diameter. Please use the exact feature as exactly as possible, too big or too small will influence the extrusion.
Filament Diameter 2: The 2nd extruder filament diameter. If the same as the main extruder, please set as 0.
Retraction (no change at best)
Minimum travel: Minimum amount of travel needed for a retraction to happen at all. To make sure you do not get a lot of retraction in a small area. R ecommended 2 as best performance, too small will lead to frequent retraction.
Enable combing: Combing is the act of avoiding holes in the print from the head to travel over. Enable combing extruder will always touch the surface of model but disable retraction. If combing is disabled the printer head moves straight from the start point to the end point and it will always retract. Default enable coming, but it will increase printing time.
Minimal extrusion before retracting: The minimal extrusion that needs to be done before retracting again. If a retraction needs to happen before this minimal is reached the retraction is ignored. This avoids retraction a lot on the same piece of filament which flattens the filament and causes grinding issues. Recommended 0.02 at best performance, 0 means unlimited retraction frequency.
Dual Extrusion
Dual extrusion switch amount: Amount of retraction when switching nozzle with dual-extrusion. After switching, the filament in the no working nozzle need to be retracted with some amount to avoid oozing. Set as 0 for no retraction at all. Recommended setting as 25 for best performance.
Cool
Enable cooling fan: Enable cooling fan during printing to help cool filament down.
Minimal layer time: The minimal time of printing layer to ensure enough cooling time before printing next layer. Print speed will adjust automatic to satisfy this feature.
Fan full on at height: The height at which the fan is turned on completely. For the layers below this the fan speed is scaled linear with the fan off at layer 0.
Fan speed min: Minimal fan speed when normal printing.
Fan speed max: Maximal fan speed when automatic slowing down printing.
Minimum speed: Minimum printing speed of each layer. Recommended setting as 10 with best performance. Too slow will result in nozzle oozing.
Cool head lift: Lift the head, if the minimal layer time is not enough, to extend the cooling time for model cooling.
Spiralize
Spiralize the outer contour: Spiralize is smoothing out the Z move of the outer edge. This will create a steady Z increase over the whole print. This feature turns a solid object into a single walled print with a solid bottom.
When enabling this feature, the top will not be printed and automatically setting infill as 0.
Skirt
Line count: The skirt is a line drawn around the object at the first layer. This helps to prime your extruder, and to see if the object fits on your platform. Recommended setting as 1 with best
performance. Setting this to 0 will disable the skirt. Multiple skirt lines can help priming your extruder better for smaller objects.
Start distance: The distance between skirt line and model. Default distance is 3.
Minimal length: The minimal length of the skirt, if this minimal length is not reached it will add more skirt lines to reach this minimal length. Recommended setting as 250 with best performance. If the line count is set to 0 this is ignored. If the model is too small to have a too short skirt line will not help to clean nozzle.
Infill
Solid infill top: Create a solid top surface, if set to false the top is filled with the fill percentage. Disable this feature and set fill density as 0 to print cups/vases that are without top model.
Solid infill bottom: Create a solid bottom surface, if set to false the bottom is filled with the fill percentage. Disable this feature and set fill density as 0 to print buildings that are without bottom model.
Infill overlap: Amount of overlap between the infill and the walls. There is a slight overlap with the walls and the infill so the walls connect firmly to the infill. Recommended setting as 10 with best performance. Too big will influence quality of model surface.
Support
Fill amount: Support print density.
Recommended setting as 15 with best performance. More density makes the support not easy to remove. Less density influences print quality.
Distance X/Y: Distance of the support material from the print, in the X/Y directions. 0.7mm gives a nice distance from the print so the support does not stick to the print. Too far will influence support performance.
Distance Z: Distance from the top/bottom of the support to the print. A small gap here makes it easier to remove the support but makes the print a bit uglier. 0.15mm gives a good separation of the support material. Too far will influence support performance.
Birm
Birm line amount: Default as 5, more lines, more firmly the model sticking to platform.
Raft
Extra margin: If the raft is enabled, this is the extra raft area around the object which is also rafted.
Line spacing: When you are using the raft, this is the distance between the centerlines of the raft line.
Fix Horrible
Combing ererything ( Type-A )/( Type-B ):This expert option adds all parts of the model together. The result is usually that internal cavities disappear. Depending on the model this can be intended or not. Enabling this option is at your own risk. Type-A is depended on the model normals and tries to keep some interal holes intace. Type-B ignores all internal holes and only keeps the outside shper per layer.
Keep open faces:This expert option keeps all the open bits of the model intact. Normally Mankati Tries to stitch up small holes and remove everything with big holes, but this option keeps bits that are not properly part of anything and just goes with whatever it is enable you to slice models otherwise failing to produce proper paths. As with all "Fix horrible" options, results may vary and use at your own risk.
Extensive stitching:Extrensive sitiching tries to fix up open holes in the model by closing the hole with touching polygons. This algorthm is quite expensive and cloud introduce a lot of processing time. As with all "Fix horrible" options, results may vary and use at your own risk.
Plugins
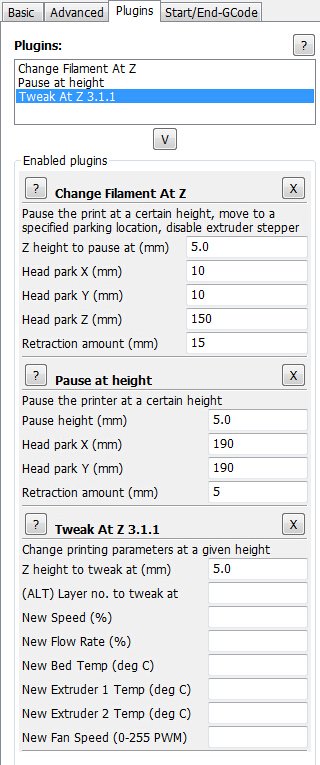
We supply 3 plugins for you. These 3 plugins will help to give stronger control feature. You can set different parameter with different print heights to have more accurate model.
Double-click certain plugin name to start using. After starting using you can set parameter in below setting interface.
If you want to cancel this plugin, click”X”on the right top of parameter setting interface.
Change Filament At Z: You can change the filament in the printing process at a certain height of the print.
Pause at height: You can pause printing at a certain height of the print, and you can percisely locate the print head position.
Tweak At Z: You can reset the printing parameters at a certain height of the print, this is a powerful option for experts.
You can reset printing speed, flow, bed temperature, nozzle temperature and fan speed.